Build an Online store blogger / blogspot is not impossible now. Yeah, as we know, many blogger trying to make money online by selling their product via blog. Blogs can be used to create an online store for free. In this article we will discuss and try to learn how to create a simple online store using free blogspot domain. Online store Blogspot using SimpleCart.js as cart function and PayPal as a payment tool. Although online store blogspot with SimpleCart.js + PayPal has many weaknesses, but interesting enough to be implemented and developed further. With a little customization we can make our simple blogspot online store alive, all you need is an ability to copy-paste the code and basic HTML knowledge.
AMD Phenom II TWKR Black Edition Processor Sold $11.600 on eBay
AMD Phenom II TWKR Black Edition Processor maybe is the most expensive AMD processor ever... it sold $11.600 on eBay charity auction, July 20, 2009 at 10:14:35 PDT. - Thursday last week, AMD processors TWKR landed on eBay. Actually the price is only 260 US dollars. The processor seems to attract many visitors. One day later, on Friday, July 17 2009, AMD Processor is in eBay auction and the price already reached 8.100 US dollars. 80 people are bidding in this auction, and the one who offer the highest price will get the processors with free shipping within two days after make a payment through PayPal. The auction is closed on Monday, 20 July 2008 and the closing price reached 11.600 US dollars...LOL :D Although the price is very expensive for a PC desktop processor, all funds obtained from the auction will be donated by AMD to social institution in Austin, Texas, United States.

AMD Phenom II TWKR Black Edition processors are not for sale as well as not given warranty by AMD. The Prosesor will only available through AMD promotion programs and there are only 100 unit available. AMD mentioned that this processor can run at speeds more than 7 GHz.

AMD Phenom II TWKR Black Edition processors are not for sale as well as not given warranty by AMD. The Prosesor will only available through AMD promotion programs and there are only 100 unit available. AMD mentioned that this processor can run at speeds more than 7 GHz.
Free Download Antivirus Microsoft Security Essentials (MSE)
Microsoft Security Essentials (MSE) is a free antivirus from Microsoft. Beta version of this product already can be installed for operating systems like Microsoft Windows 7 Beta and RC (32 or 64 bit), Vista RTM, SP1 and SP2 and Windows XP SP3 32 bit. You can get free download MSE antivirus. Make sure that the minimum PC specifications have been met to run this application. Minimum requirements / specifications :
- For Windows XP-CPU with clock speed 500 MHz or higher
- For Windows XP - Memory: 256 MB RAM or higher
- For Windows Vista / W7 - CPU with clock speed 1.0 GHz or higher
- For Windows Vista / W7 - Memory: 1 GB RAM or higher
- VGA (Display): 800 x 600 or higher
- Storage: 140 MB
This is the link to free download MSE antivirus from their official site. But now, Microsoft limiting the number of MSE downloads. At this time, may be you can not download anti-virus from official Microsoft site. Some users may encounter the following message from Microsoft when trying to download MSE anti virus:
As an alternative, Softpedia provides download links for MSE Antivirus for several versions, here are the links:
MSE for Windows XP download
MSE for Windows 7 & Vista 32 bit download
MSE for Windows 7 & Vista 64 bit download
Please note that the link to free download page are alternative links from Softpedia server, not Microsoft.
UPDATE : Beta version has expired, Microsoft has launched the final MSE on September 29, 2009
- For Windows XP-CPU with clock speed 500 MHz or higher
- For Windows XP - Memory: 256 MB RAM or higher
- For Windows Vista / W7 - CPU with clock speed 1.0 GHz or higher
- For Windows Vista / W7 - Memory: 1 GB RAM or higher
- VGA (Display): 800 x 600 or higher
- Storage: 140 MB
This is the link to free download MSE antivirus from their official site. But now, Microsoft limiting the number of MSE downloads. At this time, may be you can not download anti-virus from official Microsoft site. Some users may encounter the following message from Microsoft when trying to download MSE anti virus:
Thank you for your interest in joining the Microsoft® Security Essentials Beta. We are not accepting additional participants at this time. Please check back at a later date for possible additional availability.
As an alternative, Softpedia provides download links for MSE Antivirus for several versions, here are the links:
MSE for Windows XP download
MSE for Windows 7 & Vista 32 bit download
MSE for Windows 7 & Vista 64 bit download
Please note that the link to free download page are alternative links from Softpedia server, not Microsoft.
UPDATE : Beta version has expired, Microsoft has launched the final MSE on September 29, 2009
EATR Robot Eat Flesh - Is It A Horror Robot?
EATR (Energetically Autonomous Tactical Robot). Previously, the robot is searching for sources of energy by devour (eating) any organic material, from grass, vegetable, wood..etc. In the newest development, robots can also get energy by eating corpses (including human corpses). "Eating organic material" - Actually this is a biological process / system. Basically we can understand it, it is a robot that can gather its own biomass fuel, deposit it into its own external combustion chamber and recharge itself. But EATR eating human's dead bodies...is it a good thing or a horror?


EATR developed by Cyclone Power in collaboration with Robotic Technology Inc. The goal of this project is to create an autonomous robot with endurance for long range missions and not need a conventional refueling. The robot will be able to get its fuel "eating food" on it’s own. Quoted from detikINET and FoxNews, Wednesday (15/7/2009), the reason why this robot is able to get energies from dead bodies, is because EATR will be used in the battlefield. Of course, many dead bodies found during wars. The robot EATR claimed to provide benefits for US military operations. For example, this robot can continue to operate independently in a long time. However, ethical question arises, eating human flesh is something that is not ethical.


EATR developed by Cyclone Power in collaboration with Robotic Technology Inc. The goal of this project is to create an autonomous robot with endurance for long range missions and not need a conventional refueling. The robot will be able to get its fuel "eating food" on it’s own. Quoted from detikINET and FoxNews, Wednesday (15/7/2009), the reason why this robot is able to get energies from dead bodies, is because EATR will be used in the battlefield. Of course, many dead bodies found during wars. The robot EATR claimed to provide benefits for US military operations. For example, this robot can continue to operate independently in a long time. However, ethical question arises, eating human flesh is something that is not ethical.
How To Host JavaScript Files For Free?
To host JavaScript files in to servers is very important for bloggers. These JavaScript work on servers and blogger call the function on their blog. Thus, it can be useful for some widgets to work properly. To host JavaScript files for free, formerly we can use google pages, but now they are not accepting new sign ups. There are other free services, such as Ripway.com and Google sites (if you know the others please share). I use Google sites recently and use it for recent posts, recent comments, tab view, etc.. Google sites still accepting new sign ups... so if you don't have sites on Google sites why don't you create one?... It is great to host files on your free server.
How to host Javascript files into Google Sites:
1. Create a new sign up on Google Sites
2. Create new site
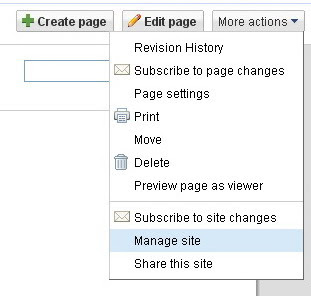
3. Go to Home - Click More Actions - Choose Manage Site
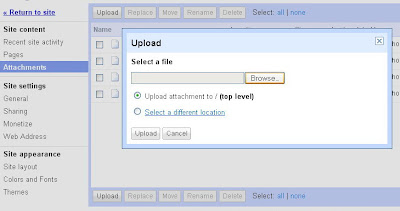
4. Choose Attachment - Upload your JavaScript file
Note : Google sites does not allow you to host files with ".js" extension. To overcome this problem you should edit / change ".js" extension to ".txt" - To do this, open yourjavascript.js with wordpad and save as to yourjavascript.txt
5. Get the Javascript URL
Right click on yourjavascript.txt attachment - choose properties
Copy and paste the URL .. for example :
http://sites.google.com/site/yoursite/yourjavascript.txt?attredirects=0
Remove ?attredirects=0 (you don't need it) , so your JS URL is :
http://sites.google.com/site/yoursite/yourjavascript.txt
Now you can use it (paste the code) into your blogger widget or template.
How to host Javascript files into Google Sites:
1. Create a new sign up on Google Sites
2. Create new site
3. Go to Home - Click More Actions - Choose Manage Site

4. Choose Attachment - Upload your JavaScript file

Note : Google sites does not allow you to host files with ".js" extension. To overcome this problem you should edit / change ".js" extension to ".txt" - To do this, open yourjavascript.js with wordpad and save as to yourjavascript.txt
5. Get the Javascript URL
Right click on yourjavascript.txt attachment - choose properties
Copy and paste the URL .. for example :
http://sites.google.com/site/yoursite/yourjavascript.txt?attredirects=0
Remove ?attredirects=0 (you don't need it) , so your JS URL is :
http://sites.google.com/site/yoursite/yourjavascript.txt
Now you can use it (paste the code) into your blogger widget or template.
Submit Blogger Sitemap to Bing, Yahoo, Google, MSN, Moreover, Ask
How to submit blogger sitemap to Google, Yahoo, Bing, MSN, Moreover and Ask? First, we have to know what is sitemap... Site map is an architecture of a website to help visitors and search engine robot to explore / browse the content of a website. Site map is useful to facilitate search engines such as Google, MSN, and others to crawl (indexing) pages of a website / blog. Thus, sitemap also helps to increase website's SEO. Sitemap introduced by Google in 2005. And now Google, Yahoo, MSN, Ask join to support the form of XML sitemap protocol.
Create a Site Map
If you have a domain site, you can generate your sitemap at http://xml-sitemaps.com. Just enter your website's URL and generate the site map. Once the site map created, copy and paste it to notepad, then save file name as : sitemap.xml . Upload the sitemap.xml file into your site / root directory. Thus the sitemap URL should be like this : http://domainname.com/sitemap.xml
If you use blogger / blogspot blog you can't upload any files into root directory. So, what is blogger sitemap? This is your Blogger / Blogspot sitemap :
or
Change red color with your blog URL
Submit Sitemap to Google.com
Go to google webmaster tool http://www.google.com/webmasters/ and log in with your google account.
Select your site - go to site configuration - Submit Sitemap - Submit a Sitemap.
Fill the box with atom.xml or rss.xml - Click Submit Sitemap
Example :

NOTE : If you don't have any sites on your google webmaster tools, you need to add your site and verify (copy the meta authentication code and paste it after <head> your authentication code... - Save - Verify)
Submit Sitemap to Yahoo.com
Simply copy and paste the code into your browser
and
Submit Sitemap to Bing.com
Submit Sitemap to Windows Live
Submit Sitemap to Moreover.com
Submit Sitemap to Ask.com
NOTE : Replace http://blogname.blogspot.com/ with your URL !!! Happy blogging :)
Create a Site Map
If you have a domain site, you can generate your sitemap at http://xml-sitemaps.com. Just enter your website's URL and generate the site map. Once the site map created, copy and paste it to notepad, then save file name as : sitemap.xml . Upload the sitemap.xml file into your site / root directory. Thus the sitemap URL should be like this : http://domainname.com/sitemap.xml
If you use blogger / blogspot blog you can't upload any files into root directory. So, what is blogger sitemap? This is your Blogger / Blogspot sitemap :
http://angga-weblog.blogspot.com/atom.xml
or
http://angga-weblog.blogspot.com/rss.xml
Change red color with your blog URL
Submit Sitemap to Google.com
Go to google webmaster tool http://www.google.com/webmasters/ and log in with your google account.
Select your site - go to site configuration - Submit Sitemap - Submit a Sitemap.
Fill the box with atom.xml or rss.xml - Click Submit Sitemap
Example :

NOTE : If you don't have any sites on your google webmaster tools, you need to add your site and verify (copy the meta authentication code and paste it after <head> your authentication code... - Save - Verify)
Submit Sitemap to Yahoo.com
Simply copy and paste the code into your browser
http://search.yahooapis.com/SiteExplorerService/V1/updateNotification?appid=SitemapWriter&url=http://blogname.blogspot.com/atom.xml
and
http://search.yahooapis.com/SiteExplorerService/V1/ping?sitemap=http://blogname.blogspot.com/atom.xml
Submit Sitemap to Bing.com
www.bing.com/webmaster/ping.aspx?siteMap=http://blogname.blogspot.com/atom.xml
Submit Sitemap to Windows Live
http://webmaster.live.com/ping.aspx?siteMap=http://blogname.blogspot.com/atom.xml
Submit Sitemap to Moreover.com
http://api.moreover.com/ping?u=http://blogname.blogspot.com/atom.xml
Submit Sitemap to Ask.com
http://submissions.ask.com/ping?sitemap=http://blogname.blogspot.com/atom.xml
NOTE : Replace http://blogname.blogspot.com/ with your URL !!! Happy blogging :)
How To Create Tab View Navigation Widget for Blogger
Tab View navigation Widget for Blogger. Tab view is a feature / widget that can be installed on your blogger / blogspot blog. Tab View is very effective, simple look, saving some space on your blog, and providing a navigation tools for your blog visitors. By using the tab view, you can display anything on your blog, for example, featured posts, recent posts, recent comments, featured category, shoutbox, popular posts, product promotions, and others. You can see the tab view demo in this blogger blog. In this tutorial we will learn, how to make the tab view widget blogspot.
This tab view version was developed by Ilya S. Lyubinskiy. You can see / download the original script on JavaScript Kit website (tab view css, javascript and HTML files). If you don't want to download them, here I provide you the code, just copy paste the code below in to your template. In this tutorial, I'll show you how to install the tab view script in to your blogger blog, very easy... just copy paste the code... needs 3-5 minutes to install Tab View Widget for blogger / blogspot.
1. Install the CSS code
Log in to blogger.com account
Go to Layout - edit HTML - Click Expand Widget Templates (don't forget to backup your template)
Copy the CSS code below, and paste it before ]]></b:skin>
div.TabView div.Tabs
{
height: 24px;
overflow: hidden;
}
div.TabView div.Tabs a
{
float: left;
display: block;
width: 90px;
text-align: center;
height: 24px;
padding-top: 3px;
vertical-align: middle;
border: 1px solid #000000;
border-bottom-width: 0;
text-decoration: none;
font-family: "Arial", Times New Roman, Serif;
font-weight: 900;
color: #000080;
}
div.TabView div.Tabs a:hover, div.TabView div.Tabs a.Active
{
background-color: #BDBDBD;
}
div.TabView div.Pages
{
clear: both;
background-color: #FFFFFF;
border: 1px solid #000000;
overflow: hidden;
}
div.TabView div.Pages div.Page
{
height: 100%;
padding: 0px;
overflow: hidden;
}
div.TabView div.Pages div.Page div.Pad
{
padding: 3px 5px;
}
2. Install JavaScript Code
I have saved the javascript code and host it into google sites, it works well... Just copy this javascript code and paste it before </head>
Save your template !!!
3. Create Tab View Widget
Go to Layout - Page Element - Add a Gadget - Choose HTML/JavaScript
Copy and paste the code below
Code marked with red color is the contents of the tab view page. You can change / fill it with links, images, banners, script, etc.
Click "Save" to finish. View your blog to see the result for Tab View Widget.
This tab view version was developed by Ilya S. Lyubinskiy. You can see / download the original script on JavaScript Kit website (tab view css, javascript and HTML files). If you don't want to download them, here I provide you the code, just copy paste the code below in to your template. In this tutorial, I'll show you how to install the tab view script in to your blogger blog, very easy... just copy paste the code... needs 3-5 minutes to install Tab View Widget for blogger / blogspot.
1. Install the CSS code
Log in to blogger.com account
Go to Layout - edit HTML - Click Expand Widget Templates (don't forget to backup your template)
Copy the CSS code below, and paste it before ]]></b:skin>
div.TabView div.Tabs
{
height: 24px;
overflow: hidden;
}
div.TabView div.Tabs a
{
float: left;
display: block;
width: 90px;
text-align: center;
height: 24px;
padding-top: 3px;
vertical-align: middle;
border: 1px solid #000000;
border-bottom-width: 0;
text-decoration: none;
font-family: "Arial", Times New Roman, Serif;
font-weight: 900;
color: #000080;
}
div.TabView div.Tabs a:hover, div.TabView div.Tabs a.Active
{
background-color: #BDBDBD;
}
div.TabView div.Pages
{
clear: both;
background-color: #FFFFFF;
border: 1px solid #000000;
overflow: hidden;
}
div.TabView div.Pages div.Page
{
height: 100%;
padding: 0px;
overflow: hidden;
}
div.TabView div.Pages div.Page div.Pad
{
padding: 3px 5px;
}
2. Install JavaScript Code
I have saved the javascript code and host it into google sites, it works well... Just copy this javascript code and paste it before </head>
<script src='http://sites.google.com/site/angga123site/tabview.txt' type='text/javascript'/>
Save your template !!!
3. Create Tab View Widget
Go to Layout - Page Element - Add a Gadget - Choose HTML/JavaScript
Copy and paste the code below
<form action="tabview.html" method="get">
<div class="TabView" id="TabView">
<div class="Tabs" style="width: 350px;">
<a>Tab 1</a>
<a>Tab 2</a>
<a>Tab 3</a>
</div>
<div class="Pages" style="width: 350px; height: 250px;">
<div class="Page">
<div class="Pad">
Tab 1.1 <br />
Tab 1.2 <br />
Tab 1.3 <br />
</div>
</div>
<div class="Page">
<div class="Pad">
Tab 2.1 <br />
Tab 2.2 <br />
Tab 2.3 <br />
</div>
</div>
<div class="Page">
<div class="Pad">
Tab 3.1 <br />
Tab 3.2 <br />
Tab 3.3 <br />
</div>
</div>
</div>
</div>
</form>
<script type="text/javascript">
tabview_initialize('TabView');
</script>
Code marked with red color is the contents of the tab view page. You can change / fill it with links, images, banners, script, etc.
Click "Save" to finish. View your blog to see the result for Tab View Widget.
Recent Posts and Recent Comments JavaScript For Blogger Blogspot
Recent Posts and recent comments widget blogger are not available in the blogger gadget. To show the recent post we can use the archive widget, but this is less satisfactory. The problem is, at the turn of each month the recent post will be lost, it shows only your monthly / yearly archive (e.g links to January, february ... archive). With some tricks, we can install recent posts and recent comments on blogger blog and make it as the useful navigation tools to facilitate you and your visitors to explore your blog. There are 2 ways to create recent posts and recent comments blogspot. First, use your blog feed. And second, add javascript code to the blogger HTML / Javascript widget.
Myrtle Beach Hotel As Your Holiday Destination
Holiday is always awaited by all people. Especially if you already spent your whole time for working, then a little refreshing will make yourself recharged. Do not forget to invite the people you love such as your family, beloved, or your friends. But feel free, if you really want to go alone on this vacation. You can meet new people also on the journey. So, where is your destination? I think beach is a popular choice for traveling. Imagine, you will be spoiled with the warmth of sun rise while you’re sunbathing on the beach. Walking or swimming is also good for your health.
Do you know that South Carolina has a beautiful coastline? It makes its beach become attractive to the tourists. Therefore this place is recommended for people who like spent their holiday on the beach. If you’re planning to spend your holiday to a nice hotel that located close to the ocean, Myrtle Beach Hotel is a recommended place to stay. This hotel is known with the luxury condominium. So, you can feel comfort like in your own house, but you will be treated by our hospitality service. Oceanfront Myrtle Beach Hotel has a nice view to the white and sandy beach. Then while you’re staying at the hotel, you can increase your golf capability by playing golf there. Furthermore, besides golfing, Myrtle Beach is well known as an attractive place for shopping and entertainment.
In addition, if you don’t want to be disappointed on your vacation, try to stay in Oceanfront Myrtle Beach Hotels. High quality and affordable price will make you easier to find the accommodation there. But, for further information, it’s better for you to click on http://www.seasidemb.com/. This site describes complete information about Myrtle Beach Hotel and facilities provided there. Thus, what are you waiting for? Please visit the Myrtle Beach and make reservation on the hotel.
Google Map Direction Gadget For Your Website
Google has launched Google Map Gadget recently. This is a direction map to help visitors to know your position (example: your business) and give them the direction "how to get there". For example, let's say that you have a hotel in Yogyakarta City, Indonesia. Your hotel's address details is: Jalan Malioboro 18, Yogyakarta 55213. Your customers (tourists) want to know the driving direction from Adisucipto Airport, Yogyakarta (or other starting point) to your hotel. What they need is a step-by-step direction from starting point (Adisucipto Airport) to your hotel's location. In this case you can provide them with Google Map Widget in your website, put it on your hotel's website and let them find the direction. It is very easy to use by your customers.
To give an illustration about the hotel, here I provide you the example.
From : Starting Point (give it a try with Adisucipto Airport)
To / Destination : "Your Hotel" is an alias for your hotel's address (Jalan Malioboro 18, Yogyakarta 55213)
Setting up Google Map Gadget is very easy, just go here
To set the destination, here is the example :
Jalan Malioboro 18, Yogyakarta 55213 (Your Hotel)
For more information go to Google Webmaster Blog
Car Reviews on thecarconnection.com
When car is invented by the creator long time ago, the function was only to make people easier to go to other place. Today, beside its purpose for transportation, having a particular car can refer to a prestige. So, it is not surprising that car can show our personality. Cars’ price also is not cheap, so you have to consider with the quality and condition before buying a car. Thus, it is better for you to read good and honest car’s review about your preferred car.
There is one excellent website that reviews all various types of cars. I suggest you to turn on your personal computer then go to thecarconnection.com. Sedan, 2 doors cars, SUVs, Vans, Trucks, Hybrid, and Luxury are reviewed here. All of the reviews are written objectively and described clearly, it s like you can know whole of the part of your preferred car, even though you never touch it. For BMW’s lovers, you must know BMW M5. This type of sporty car is well known because of its high end features. If you really want to know about the styling, performance, quality, safety, and features of MBW M5, you can directly go to bmw m5 page.
Moreover, GMC trucks’ fans will be pleased if they surf on gmc trucks. All various types of GMC Trucks can be found here. GMC Sierra 1500 Hybrid also a good choice for you who want to have a car with minimal pollution. Since the quality of environmental is decreasing and all the time, having a hybrid car is an excellent choice for helping our atmosphere. Furthermore, don’t forget to take a look at subaru outback page. This car is really elegant and you would not be disappointed if you buy this car. Do you still consider about what kind of trucks to buy? Don’t be hesitate to browse on truck page. Numerous types of trucks are provided here, so you would be helped to choose your truck after reading the review here. So, what are you waiting for? This online site make you easier to find the suitable car, therefore you will not be disappointed because of buying the wrong car.
How To Show Only Post Title In Label and Archive Pages?
How to show only post title in label / archive pages? Blogger default setting is not set to show only title links, but will show all article (title links and articles) under the same label or archive. Imagine if you have 20+ posts under 1 label / archive, when user click on label / archive link, your blog will show all 20+ articles (title and article) on one page. I think it is not effective, make computer slow loading and there are probabilities your visitors miss your interesting posts (because it is too much for the eyes to look at all the content in one page). So, when your blog already have lots of posts, you need to consider to set your blog to show only post title links on label / archive pages.
Many blogger experts had explained this hack method. I know this blogger hack from Bloganol.com, I have tried the method... very easy to do and it is work well. Then lets begin to install it.
First of all, log in to your blogger.com account - Go to Layout Setting - Edit HTML .. don't forget to backup your template.
Find this code <b:include data='post' name='post'/>
Change the code above with this code :
Save your template and let's test it ... happy blogging :)

Many blogger experts had explained this hack method. I know this blogger hack from Bloganol.com, I have tried the method... very easy to do and it is work well. Then lets begin to install it.
First of all, log in to your blogger.com account - Go to Layout Setting - Edit HTML .. don't forget to backup your template.
Find this code <b:include data='post' name='post'/>
Change the code above with this code :
<b:if cond='data:blog.homepageUrl
!= data:blog.url'>
<b:if cond='data:blog.pageType != "item"'>
<h3 class='post-title'><a expr:href='data:post.url'><data:post.title/></a></h3>
<b:else/>
<b:include data='post' name='post'/>
</b:if>
<b:else/>
<b:include data='post' name='post'/>
</b:if>
Save your template and let's test it ... happy blogging :)
Easiest Way to Shop and Being Fashionable
Have you ever get any difficulties to find clothes that suit to your preference and also to your pocket? Sometimes I find it hard to choose the appropriate model for me, so one of the solutions is I have to go to many stores, just for look one clothes. But even I already get the dress that I really want; the price that is offered is beyond my pocket. Ouch, that is a wretched. Especially if you consider that you already sacrifice much for this shopping activity likes spending your time and money for the gasoline or paying taxi. Furthermore, I believe that all of you think to find clothes through the internet. I do agree that it’s an easiest way, but have you notice that there is a website that provide various types of clothes, accessories and also completed with guides?
Shopwiki is the best choice for men and women who want to look fashionable, this site is like heaven. This clothing online shop shows many great outfits for any age and occasion. If you like to match your costume with the season, they give you extraordinary guides that will make you look bright. For example, women autumn style guides. In autumn you can be seen marvelous by following the advice from this site. Try the oversized knits or plaid jacket to warm up your body and make you look fashionable. But, if you want to try something new, the cocoon coat will make you look elegant. Furthermore, for summer style design, tiny floral design in short dresses will cheer up your day. Gladiator like shoes will also attractive on your foot.
Shopwiki also provides men need of fashion. Special occasion require good clothes. So, don’t forget to buy dinner jacket from shopwiki to propose your girl. While browsing for the suit, don’t forget to click on jewellery on shopwiki accessories. If you want to surprise your girl with the classic touch, I suggest you choose the antique engagement ring. All of them are pretty, then various model and price are provided. Do you want to visit your sister’s baby? Do you want to bring a gift for the baby? Just click children’s wiki clothing and do not forget to read the basic buying tips for infants there. You will be helped to choose the right suit for your cousin. In conclusion, they make all things easier to shop. Thus, never think that being fashionable is hard.
Social Bookmark Button In Blogger Posts
Adding social bookmark to blogger blogspot blog can be done easily, you do not need to know such complicated HTML / javascript code. Social bookmark button is a tool for you and your visitor to submit or bookmark (save) your article / web pages on the internet (that is social bookmark sites). Yes, not only you can submit your article, if your visitors like to read your article and they want to save and share with others, they can save / share it with this button. Why submitting your article to social bookmark sites? because your blog can get free backlinks from them. Not only that, it can also generates traffic to your blog. Let's say that you have an interesting (quality) article that what most people looking for, and you save your article in social bookmarking sites... well.. don't get surprised if you get lots of visitors :) they will visit your blog to read your article & looking more information from your blog.
No need knowledge in HTML / Javascript code means that you can use the script from third party. There are many third party sites that can provide you the button. How to add social bookmark button to your blogspot blog? All you can do is simply add the script to your blog. In this tutorial we will learn to install the social bookmark button on each blog posts. Before we start, make sure that your blog has "Read More" feature.
Two sites that I can recommend you are addthis.com (need to create an account) and addtoany.com (do not need to create an account). Both are free..
Button from addthis.com
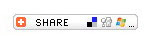
Button from addtoany.com (Share and Subscribe Button)

For example, we will install the button code from addtoany.com. With addtoany you can install social bookmark button and subscribe button.
1. Go to addtoany.com
2. Choose whether you want to create share button or subscribe button
3. Create your button
For share button :
Fill the form, button style, "Page Name" and "Page Url" then click "Get Code"
For subscribe button :
Fill the form, button style, "Feed Name" and "Feed Url" (example: http://your-blog-url.blogspot.com/feeds/posts/default) then click "Get Code"
4. Install your code
Log in to your blogger.com account - Go to Layout section - Edit HTML (click expand template widget), and don't forget to backup your template!
Search this code <p><data:post.body/></p>
Copy the code from addtoany.com and paste it after (below) this code <p><data:post.body/></p>
5. Save your template and see the result :)
NOTE : Want to add BIG Social Bookmark Button?
Internet Business Model
Internet business model have been very popular today. Internet is like a big cake for all business performers, then we call it online business. As we know, online business model is very diverse. There are many business model you can choose. When you choose to involved in online business, I think it is better for you to focus on one or two business model (not all) because the key to success is focus on the business that you do. Diversification is a good thing as long as you are able to manage it and not overwhelmed. Identified the kind of business online, you can choose which one is suitable for you, save your time and energy to learn and conduct business model that fit with you since the beginning. I believed that before you find the best online business model, you need to learn and need some times to observe which one is the most suitable for you.
Though that there are many popular online business model, basically we can classified them. At least there are 5 (five) major online business model on the internet.
1. Sell Your Own Product
You can sell your own products (your online store), whether from your own production or product from another person that you stock. This category is a business model in the earliest time on the internet and this category is the most popular business model on the internet now. Products that are sold can be either tangible products and digital products or intangible product, such as MP3, ringtone, software, ebook, membership, and others.
2. Sell Your Own Service
This category is a business model that thrive at this time. Generally you are selling something of skill or expertise that you have. People (that need your service) will pay for your expertise. For example: create a website services, services, create ebook, create a computer program, create a logo design / banner, article writing services, translation services, services to be a virtual personal assistant, virtual office services, SEO services, PPC advertising management services and others. All services and transactions are not directly face to face, all conducted virtually through the internet.
3. Affiliate Marketing
Affiliate marketing is to sell products or give product / service reference (from seller / store / company) to peoples with compensation commission for each sales transaction (pay per sale), for any leads / prospects are given (pay per lead) or for each click made (pay-per-click). MLM or Network marketing that running online is also include in affiliate marketing category.
4. Contextual Advertising
Contextual advertising is a category business model where you have a website with certain content / information that has many daily visitors. You get money / earnings from your contextual ad, adsense in the form of text ads, banners or videos that are relevant to the content of your website. For example, your website is about financial management, including risk management, portfolio management, insurance and others. So the ads that will appear on your website are related to financial management services such as insurance, financial or asset management, risk management and others.
5. Site Flipping
Site flipping is a business model that has activities buy and sell websites. Website is an asset, it is like a house. Some people create a website on a purpose, to sell it latter. There are many people who purchase a website that still have low value, they optimized websites so that the sale value is more higher.
Source : e-course day2-modelbisnisbagian1, free e-book from http://www.belajarbisnisinternet.com
Related Posts Widget for Blogger (Blogspot)
After we learn about how to add save as PDF button, now we will learn about how to add related posts on blogger. Many thanks for Fatihsyuhud and SnapHow.Com author, blogger experts who willing to share experiences and provide a tutorial to create a related posts widget for blogger / blogspot users. I found it is easy to implement in my blog, I have tried this method and it works well :)
Related posts widget is important for your blog. Actually, its main objective is to provide your visitors an easy navigation when they open your web page and want to find more interesting articles in your blog. If they find some interesting links (in your related posts), they will visit to other pages within your blog, thus it will increase their "time on site". It will also increase your pages CTR (Clicks Through Ratio), means more page impression for adsense.
In this tutorial we will learn how to install related posts below the post content, just follow to this steps:
1. Log in to your blogger account
2. Go to Layout Section - Edit HTML (download your template before make some changes)
3. Click Expand Template Widget
4. Find (Ctrl-F) this code
5. Copy this code <div id='related_posts'/> and paste it after this code
6. So, the result will be look like this :
7. Copy this code
8. Paste it before </body>
9. Save your template and see the result.
If everything goes smooth, the result will be look like this:

You can see that the default settings will show default title "Related Posts" and it shows maximum 10 related posts. You can customize the title and set the total related post whatever you like.
Customizing Title and Number of Posts
Change the original code (in point 7),
with this code :
You can change the title (marked with red color) and change the number of related posts (marked with green color)
Save your template and see the result... Enjoy your related posts blogger widget, happy blogging :)
Related posts widget is important for your blog. Actually, its main objective is to provide your visitors an easy navigation when they open your web page and want to find more interesting articles in your blog. If they find some interesting links (in your related posts), they will visit to other pages within your blog, thus it will increase their "time on site". It will also increase your pages CTR (Clicks Through Ratio), means more page impression for adsense.
In this tutorial we will learn how to install related posts below the post content, just follow to this steps:
1. Log in to your blogger account
2. Go to Layout Section - Edit HTML (download your template before make some changes)
3. Click Expand Template Widget
4. Find (Ctrl-F) this code
<div style='clear: both;'/> <!-- clear for photos floats -->
</div>
5. Copy this code <div id='related_posts'/> and paste it after this code
<div style='clear: both;'/> <!-- clear for photos floats -->
</div>
6. So, the result will be look like this :
<div style='clear: both;'/> <!-- clear for photos floats -->
</div>
<div id='related_posts'/>
<div class='post-footer'>
7. Copy this code
<script src='http://www.google.com/jsapi'></script>
<script src='http://brps.appspot.com/brps.js' type='text/javascript'/>
8. Paste it before </body>
9. Save your template and see the result.
If everything goes smooth, the result will be look like this:

You can see that the default settings will show default title "Related Posts" and it shows maximum 10 related posts. You can customize the title and set the total related post whatever you like.
Customizing Title and Number of Posts
Change the original code (in point 7),
<script src='http://www.google.com/jsapi'></script>
<script src='http://brps.appspot.com/brps.js' type='text/javascript'/>
with this code :
<script src='http://www.google.com/jsapi'></script>
<script type="text/javascript">window.brps_options = { "title": "<h2>Related Articles!</h2>" "max_results": 5 }</script>
<script src='http://brps.appspot.com/brps.js' type='text/javascript'/>
You can change the title (marked with red color) and change the number of related posts (marked with green color)
Save your template and see the result... Enjoy your related posts blogger widget, happy blogging :)